How to build strength without weights using bodyweight exercises at home? Forget those dusty dumbbells gathering dust in the corner! This isn’t your grandma’s aerobics class; we’re talking about transforming your body into a finely-tuned, gravity-defying machine using nothing but your own amazing self. Prepare to unleash your inner superhero, one push-up, squat, and plank at a time.
We’ll cover everything from beginner-friendly moves to advanced techniques, ensuring you build strength and sculpt a physique that would make Hercules jealous – all from the comfort of your living room (no gym membership required!).
This guide dives deep into the world of bodyweight training, revealing the secrets to maximizing your strength gains. We’ll equip you with a comprehensive understanding of fundamental exercises, progressive overload techniques, and personalized workout planning. Plus, we’ll tackle common mistakes and offer nutritional advice to fuel your fitness journey. Get ready to redefine your strength potential – it all starts with you!
Introduction to Bodyweight Strength Training
So, you want to get ripped, but the thought of grunting under a barbell makes you want to hide under a rock? Fear not, fellow fitness fugitive! Bodyweight training is here to save the day (and your wallet). Forget expensive gym memberships and confusing weight machines; your own body is the ultimate training tool, ready to sculpt you into a superhero (or at least a slightly stronger version of yourself).Bodyweight exercises utilize your own weight as resistance, making them incredibly versatile and effective for building strength, endurance, and overall fitness.
Think push-ups, squats, lunges, planks – moves that may seem simple, but hold the power to transform your physique and boost your confidence. The best part? You can do them anywhere, anytime, with zero equipment. No more excuses!
Advantages of Home-Based Bodyweight Training
Forget the gym’s crowded atmosphere, the annoying guy hogging the squat rack, and the monthly fees that could buy you a small island (okay, maybe a slightly larger rock). Training at home with bodyweight exercises offers several compelling advantages. First, it’s incredibly convenient. No commute, no waiting for equipment, just pure, unadulterated fitness whenever your schedule (and your motivation) allows.
Second, it’s budget-friendly. Your investment is minimal – maybe a yoga mat if you’re feeling fancy – leaving more money for, well, anything else you desire (like that small island). Finally, it’s incredibly adaptable. You can tailor your workouts to your fitness level, gradually increasing the intensity and complexity of the exercises as you get stronger. Think of it as a personalized, on-demand fitness experience, designed specifically for you, the amazing human being you are.
Motivational Tips for Beginners
Starting any new fitness routine can feel daunting, but remember, even the strongest superheroes started somewhere. Begin with simple exercises and focus on proper form. Don’t rush into advanced moves before your body is ready; it’s a marathon, not a sprint (unless you’re into sprints, then, by all means, sprint!). Consistency is key. Aim for regular workouts, even if it’s just for 15-20 minutes a day.
Find a workout buddy (or a motivational pet) to keep you accountable and motivated. And most importantly, celebrate your progress! Each push-up, each squat, each plank brings you closer to your fitness goals. Remember that feeling of accomplishment; it’s incredibly powerful. You got this!
Fundamental Bodyweight Exercises: How To Build Strength Without Weights Using Bodyweight Exercises At Home
So, you’re ready to ditch the dumbbells and embrace the glorious power of your own body? Fantastic! Bodyweight training is a fantastic way to build strength, improve endurance, and sculpt a physique that would make Michelangelo weep with joy (in a good way, of course). Let’s dive into the foundational exercises that will form the bedrock of your awesome, weight-free fitness journey.
These exercises are incredibly versatile and can be modified to suit all fitness levels. Remember, proper form is key to maximizing results and avoiding injuries. Think of your body as a finely tuned machine – treat it with respect, and it will reward you handsomely.
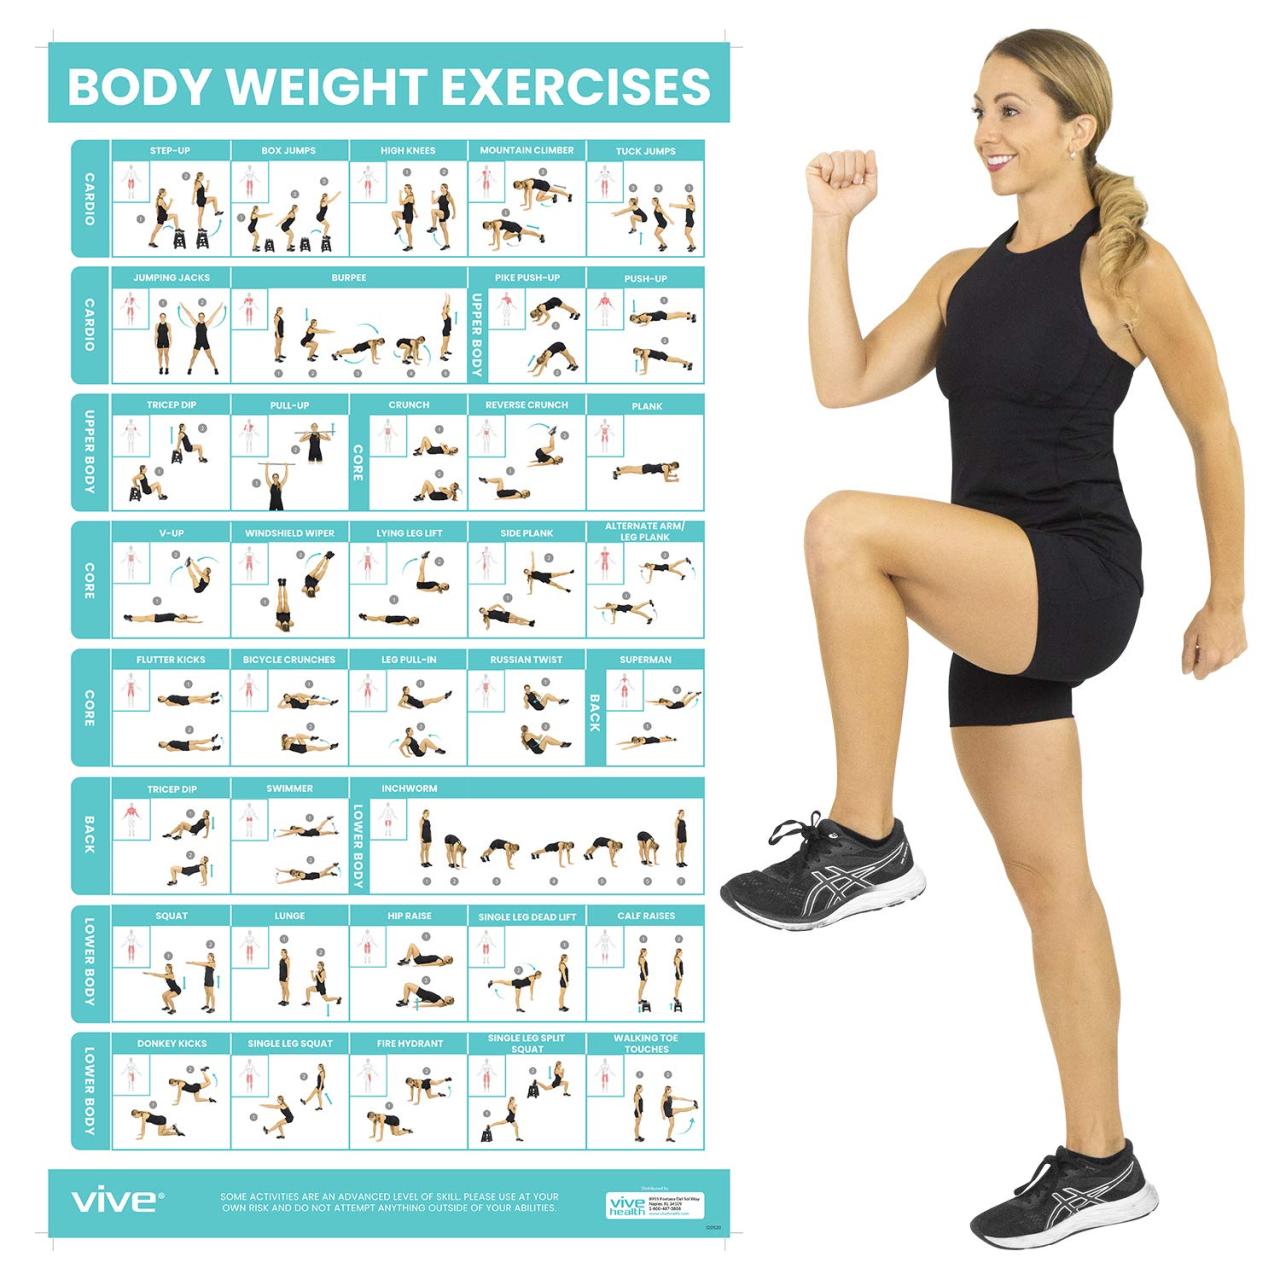
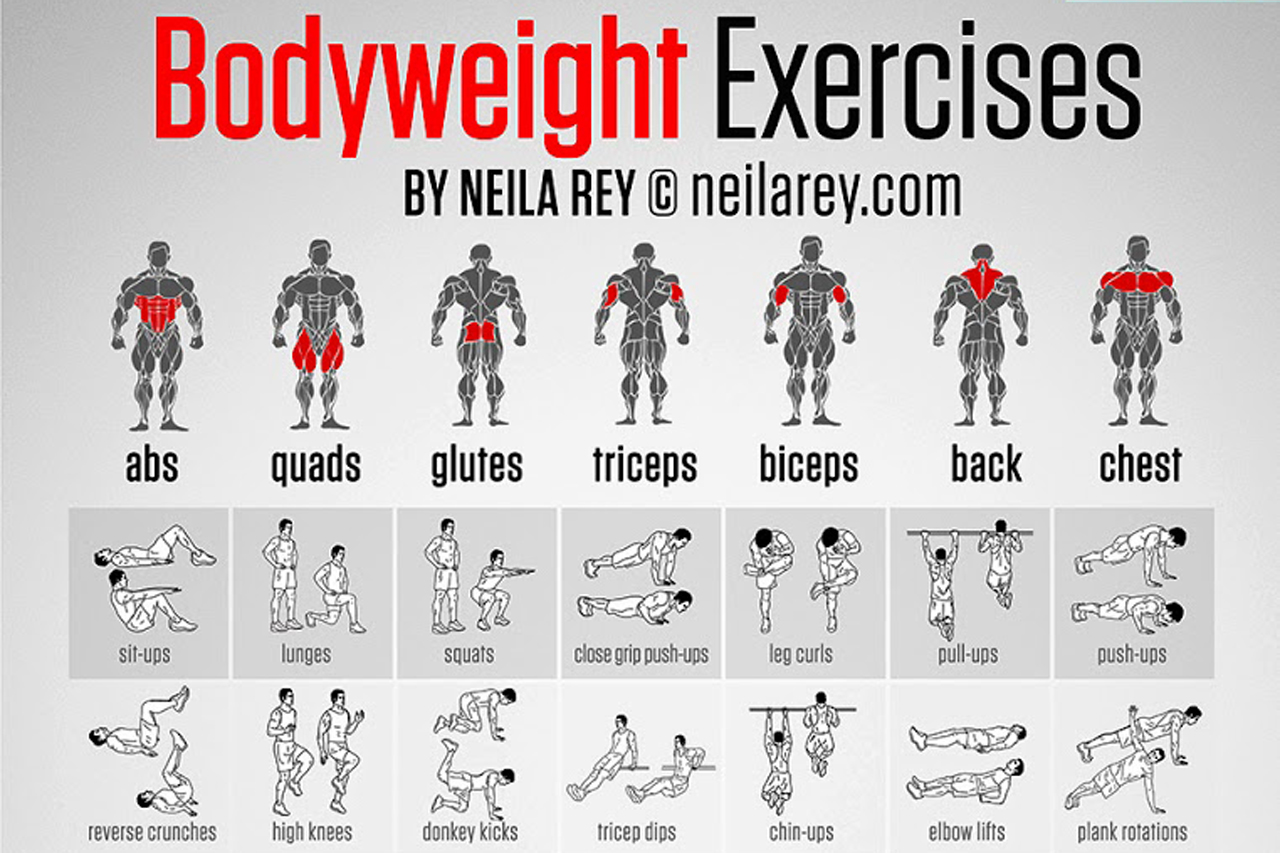
Fundamental Bodyweight Exercises Chart
Here’s a handy table summarizing some key bodyweight exercises, their target muscle groups, and some variations to keep things interesting (and challenging!).
| Exercise Name | Target Muscle Group | Description | Variations |
|---|---|---|---|
| Push-ups | Chest, Triceps, Shoulders | A classic upper body exercise performed by lowering your body towards the floor using your arms. | Incline (hands on elevated surface), Decline (feet on elevated surface), Diamond (hands close together), Wide (hands far apart) |
| Squats | Quads, Glutes, Hamstrings | A lower body exercise where you lower your hips as if sitting in a chair, keeping your back straight. | Jump Squats, Pistol Squats (advanced), Goblet Squats (holding a weight), Sumo Squats |
| Lunges | Quads, Glutes, Hamstrings | A lower body exercise involving stepping forward or backward with one leg, bending both knees to 90 degrees. | Forward Lunges, Reverse Lunges, Walking Lunges, Lateral Lunges |
| Plank | Core (Abdominals, Obliques, Lower Back) | An isometric exercise where you hold your body in a straight line from head to heels, supported by your forearms and toes. | Side Plank, Forearm Plank, High Plank |
| Burpees | Full Body | A high-intensity full-body exercise combining a squat, push-up, and jump. | Burpee with a Tuck Jump, Burpee with a Push-up, Slow Burpee (focus on control) |
Proper Form and Technique
Mastering proper form is crucial for maximizing results and preventing injuries. Let’s break down the essentials for each exercise:
Push-ups: Maintain a straight line from head to heels. Don’t let your hips sag or your back arch. Lower yourself until your chest nearly touches the floor, then push back up explosively. Think “chest-to-floor, controlled ascent.”
Squats: Keep your back straight, chest up, and core engaged. Imagine sitting back into a chair. Ensure your knees don’t go past your toes. A slight lean forward is acceptable, but avoid excessive rounding of the back.
Lunges: Step forward or backward with one leg, bending both knees to 90 degrees. Keep your front knee aligned with your ankle and avoid letting your knee collapse inwards. Maintain a straight back and engage your core.
Plank: Maintain a straight line from head to heels, engaging your core. Avoid sagging in the middle or letting your hips rise. Hold the position for as long as you can maintain good form.
Ditch the dumbbells, ladies! Building strength at home with just your bodyweight is totally doable – think push-ups, squats, and planks. But if you’re over 50 and want to explore more options, check out this awesome resource on Best weight training exercises for women over 50 for some extra oomph. Then, get back to those bodyweight bliss-ups – your muscles will thank you!
Burpees: Start with a squat, then kick your feet back into a plank position. Perform a push-up (optional), then return to the squat position and jump up explosively. Land softly and repeat. Control is key – avoid sloppy form to prevent injuries.
Sample Beginner Workout Routine
This routine is perfect for beginners. Remember to listen to your body and rest when needed. Aim for 3 sets of 10-12 repetitions for each exercise, with a 60-second rest between sets.
Workout 1:
Push-ups (10-12 reps)
Squats (10-12 reps)
Lunges (10-12 reps per leg)
Plank (30 seconds hold)
Rest (60 seconds)
Repeat 2 more times
Workout 2:
Incline Push-ups (10-12 reps)
Squats (10-12 reps)
Walking Lunges (10-12 reps per leg)
Side Plank (30 seconds hold per side)
Burpees (5-8 reps)
Rest (60 seconds)
Repeat 2 more times
Remember to gradually increase the intensity and duration of your workouts as you get stronger. Consistency is key! Soon, you’ll be effortlessly conquering these exercises and feeling stronger than ever before. And who knows, you might even start quoting Michelangelo yourself.
Progressive Overload Techniques

So, you’ve mastered the plank, conquered the push-up, and are practically a human pretzel with your newfound bodyweight prowess. Fantastic! But to truly sculpt those muscles into magnificent monuments of strength, you need to keep challenging them. Enter: progressive overload – the secret weapon of the bodyweight warrior. It’s all about gradually increasing the difficulty of your exercises to continuously stimulate muscle growth and strength gains.
Think of it as a constant game of “one-upmanship” with your own body.Progressive overload isn’t about throwing yourself into ridiculously hard exercises and risking injury. It’s a strategic, slow-and-steady approach that ensures you get stronger without getting sidelined by aches and pains. We’ll explore several ways to cleverly outsmart your muscles and force them to adapt and grow.
Increasing Exercise Difficulty
There are several ways to crank up the intensity of your bodyweight workouts. It’s not just about doing more reps; it’s about making those reps harder. One simple approach is to increase the number of repetitions or sets you perform. For example, if you’re comfortably doing three sets of ten push-ups, aim for three sets of twelve next week.
However, this isn’t always enough, especially as you get stronger. That’s where clever exercise modifications come in.
Modifying Exercises for Increased Intensity
Imagine a push-up. Simple, right? Wrong! By altering the angle of your body, you significantly change the difficulty. Incline push-ups (hands on a raised surface) are easier than standard push-ups, while decline push-ups (feet elevated) are significantly harder. Similarly, a standard squat can be made more challenging by performing jump squats, adding a plyometric element that recruits more muscle fibers and increases the intensity.
- Incline/Decline Variations: As mentioned, changing the angle of your body during exercises like push-ups, lunges, and planks alters the resistance and engages different muscle groups. A decline push-up places more emphasis on the upper chest, while an incline push-up targets the lower chest and shoulders. Experiment with different inclines and declines to find what works best for you.
- Adding Resistance: While we’re focusing on bodyweight, you can introduce resistance using things readily available at home. A weighted backpack, filled with books or other heavy objects, can add resistance to squats, lunges, and even walking lunges. Just ensure the weight is manageable and doesn’t compromise your form.
- Plyometrics: Incorporating explosive movements like jump squats, clap push-ups, or box jumps significantly increases the intensity of your workout. These exercises require more power and explosiveness, leading to greater strength gains. Remember to master the basic movement before attempting the plyometric variation to avoid injury.
- Isometric Holds: Holding a static position, such as a plank or a wall sit, for an extended period increases muscular endurance and strength. Gradually increase the hold time to progressively overload your muscles.
The Importance of Rest and Recovery
Remember, your muscles don’t grow during your workout; they grow during rest. Think of it like this: you’re tearing down muscle fibers during your workout, and your body rebuilds them stronger during rest. Failing to give your body adequate rest can lead to overtraining, injury, and a plateau in your progress. Aim for at least one day of rest per week, and listen to your body.
If you’re feeling excessively sore or fatigued, take an extra rest day. Adequate sleep (7-9 hours per night) and proper nutrition are also crucial for muscle recovery and growth. Don’t underestimate the power of a good night’s sleep – it’s your secret weapon in the battle for strength gains!
Advanced Bodyweight Exercises and Progressions
So, you’ve conquered the basics of bodyweight training – congratulations, you magnificent beast! You’re now ready to tackle the more challenging exercises that will truly sculpt you into a human powerhouse. These advanced moves demand more strength, balance, and coordination, but the rewards are well worth the effort. Think of it as leveling up in the ultimate fitness video game – only the prizes are a stronger, more agile you.
The key to mastering these advanced exercises lies in progressive overload, which we covered earlier. Remember, it’s not about brute force, but about smart, consistent progression. Start slow, focus on proper form, and gradually increase the difficulty. Think of it like climbing a mountain – one steady step at a time, and soon you’ll be conquering peaks (or, you know, killer handstand push-ups).
Handstand Push-Ups, How to build strength without weights using bodyweight exercises at home
Handstand push-ups are the ultimate upper body challenge. They require incredible shoulder strength, core stability, and balance. Don’t worry if you can’t do a full handstand push-up right away – most people can’t! We’ll build up to it gradually.
Progression 1: Pike Push-Ups. Start with your hands shoulder-width apart on the floor, and your feet elevated on a bench or chair, forming an inverted V-shape. Perform push-ups in this position. This targets the shoulders and triceps, building the necessary strength for the next step. Imagine a slightly less intense version of the full handstand push-up. The steeper the incline, the easier it is.
Gradually decrease the incline as you get stronger.
Progression 2: Incline Handstand Push-Ups. Lean against a wall, placing your hands shoulder-width apart, a few inches from the wall. Kick up into a handstand, supporting your weight against the wall. Perform push-ups, using the wall for balance and support. As your strength increases, gradually move your hands further away from the wall, reducing the support.
Progression 3: Freestanding Handstand Push-Ups. Once you’re comfortable with incline handstand push-ups, try performing them without the wall. This requires significant balance and core strength. Start with just a few repetitions, focusing on maintaining a straight line from your head to your heels. Spotters can be helpful for beginners. Think of it as a graceful dance with gravity, where you are the ultimate choreographer.
Pistol Squats
Pistol squats are a single-leg squat that will make your legs scream (in a good way, we promise!). They demand incredible leg strength, balance, and flexibility.
Progression 1: Assisted Pistol Squats. Hold onto a sturdy object, like a chair or table, for support. Perform a single-leg squat, using the object to help maintain your balance. Focus on maintaining good form and depth. As you gain strength, reduce the amount of support you need.
Progression 2: Box Pistol Squats. Place a sturdy box or bench behind you. Perform a single-leg squat, lowering yourself until your glutes lightly tap the box. This helps you get accustomed to the range of motion and depth. Gradually decrease the height of the box as your strength and balance improve.
Progression 3: Full Pistol Squats. Once you’re comfortable with assisted and box pistol squats, try performing them without any assistance. This requires significant leg strength, balance, and coordination. Start with a few repetitions on each leg and gradually increase the number as you get stronger. It might feel like a one-legged ballet, but the results will be undeniably impressive.
Muscle-Ups
Muscle-ups are a dynamic movement combining a pull-up and a dip, requiring exceptional upper body strength and explosive power.
Progression 1: Pull-Ups. Master the basic pull-up before even thinking about muscle-ups. This builds the necessary pulling strength. If you can’t do a pull-up, work on assisted pull-ups using resistance bands or a pull-up assist machine.
Progression 2: Dips. Practice dips to build the necessary pushing strength. Start with assisted dips if needed.
Progression 3: False Grip Pull-Ups. Practice pull-ups with a false grip (grasping the bar with your thumbs underneath). This is crucial for transitioning into the muscle-up.
Progression 4: Explosive Pull-Ups. Work on performing explosive pull-ups, generating enough power to bring your chest to the bar. This is the key to the transition phase of the muscle-up.
Progression 5: Muscle-Up Transition Practice. Practice the transition from the pull-up to the dip. This may require practice on rings or using a specialized muscle-up bar to assist.
Progression 6: Full Muscle-Ups. Once you’ve mastered the previous progressions, you’ll be ready to attempt full muscle-ups. Remember to focus on maintaining good form and control throughout the movement. It’s a testament to your dedication and strength, a truly impressive feat of bodyweight mastery.
Creating a Personalized Workout Plan
So, you’ve mastered the fundamentals of bodyweight training – congratulations, you magnificent beast! Now it’s time to forge your own path to peak physical prowess. Crafting a personalized workout plan isn’t rocket science (though it might feel like it sometimes), but a little strategic planning goes a long way. Think of it as designing your own superhero training montage, tailored to your unique strengths and weaknesses.Designing a personalized workout plan involves understanding your current fitness level and setting realistic goals.
This isn’t about becoming a superhuman overnight; it’s about consistent progress. Start by honestly assessing your current strength and endurance. Can you comfortably do 10 push-ups? 20 squats? If not, that’s perfectly fine! We’ll build you up gradually.
Then, decide what you want to achieve. Increased strength? Improved endurance? Better flexibility? Defining your goals will guide your workout choices.
Determining Fitness Level and Setting Goals
To accurately assess your fitness level, consider performing a few simple tests. For example, time how long you can hold a plank, count how many push-ups you can do with good form, and gauge how many squats you can perform before fatigue sets in. These metrics will serve as your baseline measurements. Set SMART goals – Specific, Measurable, Achievable, Relevant, and Time-bound.
Instead of vaguely aiming for “get stronger,” try “increase my push-up count from 5 to 10 in four weeks.” This clarity keeps you focused and motivated.
Example Workout Schedules
Choosing the right workout schedule depends on your goals and available time. A full-body workout hits all major muscle groups in each session, ideal for beginners or those short on time. An upper/lower split focuses on upper body one day and lower body the next, allowing for more intense training per muscle group with adequate rest. Here are examples:Full-Body Workout (3 days a week):
- Day 1: Push-ups (3 sets of as many reps as possible), Squats (3 sets of 15 reps), Plank (3 sets, 30-second hold), Lunges (3 sets of 10 reps per leg)
- Day 2: Rest
- Day 3: Pull-ups (as many reps as possible, or negative pull-ups if you can’t do full ones), Glute Bridges (3 sets of 15 reps), Side Plank (3 sets, 30-second hold per side), Calf Raises (3 sets of 20 reps)
- Day 4: Rest
- Day 5: Repeat Day 1
- Day 6 & 7: Rest
Upper/Lower Split (4 days a week):
- Day 1: Upper Body (Push-ups, Dips, Plank variations, Incline Push-ups)
- Day 2: Lower Body (Squats, Lunges, Glute Bridges, Calf Raises)
- Day 3: Rest
- Day 4: Upper Body (Pull-ups, Rows, Handstand practice, Pike Push-ups)
- Day 5: Lower Body (Jump Squats, Walking Lunges, Single-leg Deadlifts, Box Jumps (if you have a box))
- Day 6 & 7: Rest
Remember to adjust these examples based on your fitness level and comfort. Start with fewer sets and reps if needed and gradually increase them as you get stronger.
Tracking Progress and Adjusting the Plan
Tracking your progress is crucial for staying motivated and making necessary adjustments. Use a journal, spreadsheet, or fitness app to record your workout sessions, including the exercises performed, sets, reps, and how you felt. Take note of any pain or discomfort. Pay attention to your body’s signals; rest when needed. If you’re not seeing progress after a few weeks, consider increasing the difficulty of your exercises (progressive overload), adding more sets or reps, or trying a different workout schedule.
Consistency is key, but don’t be afraid to adapt your plan to fit your needs. Think of your workout plan as a living document, always evolving and improving along with you.
Nutrition and Recovery for Strength Building

So, you’ve conquered the burpees, mastered the planks, and are feeling like a superhero (minus the cape, obviously). But even the mightiest of home-workout warriors need fuel and rest to truly thrive. Think of your body as a finely tuned engine – you wouldn’t run it on low-grade fuel and expect peak performance, would you? Proper nutrition and recovery are the secret ingredients to unlock your body’s full strength-building potential.
Let’s dive into how to feed your muscles and give them the downtime they deserve.Building muscle and getting stronger isn’t just about pushing your body to its limits; it’s about providing it with the building blocks and the time it needs to repair and rebuild itself stronger than before. Think of it like this: you wouldn’t expect a house to be built without bricks and mortar, and you can’t expect your muscles to grow without the right nutrients and adequate rest.
This section explores the crucial role of nutrition and recovery in maximizing your bodyweight training gains.
Macronutrient Requirements for Muscle Growth
To build strength, you need to prioritize protein, carbohydrates, and healthy fats. Protein is the primary building block of muscle tissue, so aim for a sufficient daily intake. Carbohydrates provide the energy your body needs for intense workouts, while healthy fats support hormone production and overall health. A good rule of thumb is to aim for a balanced macronutrient ratio tailored to your individual needs and activity level, perhaps consulting a nutritionist or using online calculators for personalized recommendations.
For example, a moderately active individual might aim for a ratio of 40% carbohydrates, 30% protein, and 30% healthy fats, but this is just a guideline; individual needs vary significantly.
Foods that Support Muscle Growth and Strength Building
The best foods for muscle growth are those packed with protein, complex carbohydrates, and healthy fats. Think lean meats (chicken, fish, turkey), eggs, legumes (beans, lentils), whole grains (brown rice, quinoa, oats), nuts, seeds, and plenty of fruits and vegetables. These provide the essential amino acids, vitamins, and minerals your body needs to build and repair muscle tissue.
For example, a chicken breast with a side of brown rice and steamed broccoli is a fantastic post-workout meal. A handful of almonds provides healthy fats and protein for a snack. Variety is key here; don’t be afraid to experiment and find foods you enjoy that fit your dietary needs.
The Importance of Sleep and Rest in Muscle Recovery
While crushing those bodyweight exercises is crucial, rest is equally important. Sleep is when your body repairs and rebuilds muscle tissue. Aim for 7-9 hours of quality sleep per night. Your muscles also need time to recover between workouts. Avoid overtraining by incorporating rest days into your routine.
Think of it like this: if you constantly hammer a nail without giving the wood time to settle, you risk splitting it. Similarly, constantly working your muscles without giving them time to recover can lead to injury and hinder your progress. Listen to your body; if you’re feeling excessively sore or fatigued, take a rest day.
This isn’t laziness; it’s smart training.
Addressing Common Challenges and Mistakes
So, you’ve bravely embarked on your bodyweight strength journey, trading the iron for your own impressive physique. Fantastic! But even the most dedicated homebody warrior can stumble. This section dissects common pitfalls and offers solutions, ensuring your path to strength is paved with gains, not groans. Let’s tackle those pesky challenges head-on!
Common Mistakes During Bodyweight Exercises
Proper form is paramount in bodyweight training. Failing to maintain correct posture not only reduces effectiveness but also increases the risk of injury. Think of your body as a finely tuned machine; incorrect use will lead to breakdowns.
- Mistake: Rushing through repetitions. Solution: Focus on controlled movements. Slow, deliberate reps ensure proper muscle engagement and minimize the chance of injury. Think quality over quantity!
- Mistake: Using momentum instead of strength. Solution: Reduce the range of motion or choose an easier variation if you find yourself relying on momentum to complete reps. Remember, it’s about building strength, not just completing reps.
- Mistake: Neglecting proper breathing. Solution: Exhale during the exertion phase (e.g., pushing up during a push-up) and inhale during the recovery phase (e.g., lowering down during a push-up). Controlled breathing helps maintain stability and power.
- Mistake: Ignoring the eccentric (lowering) phase of the movement. Solution: Focus on the lowering portion of the exercise. A controlled descent engages more muscle fibers and leads to greater strength gains. Think slow and steady wins the race!
Challenges Faced by Beginners and Strategies to Overcome Them
Beginning a new fitness routine can feel daunting. Many beginners struggle with motivation, consistency, and understanding the fundamentals. But fear not! With a structured approach and the right mindset, these hurdles are easily overcome.
- Challenge: Lack of Motivation. Solution: Set realistic, achievable goals. Start small and gradually increase the intensity and duration of your workouts. Celebrate small victories to stay motivated. Find a workout buddy for added accountability and fun.
So you want to build a body like a Greek god, huh? Forget those dusty dumbbells; bodyweight exercises at home are where it’s at! Want a structured approach? Check out this best strength training program for some serious inspiration. Then, get back to those push-ups, planks, and squats – your superhero physique awaits!
- Challenge: Difficulty with Progression. Solution: Begin with easier variations of exercises and gradually progress to more challenging ones as you get stronger. For example, start with incline push-ups before attempting standard push-ups. Remember, consistency is key!
- Challenge: Soreness and Discomfort. Solution: Listen to your body. Rest and recover when needed. Don’t push through extreme pain. Proper warm-up and cool-down routines are essential in minimizing discomfort and preventing injuries.
Ditch the dumbbells, folks! Building serious strength at home is totally doable with just your bodyweight. Want to know the secret? Mastering fundamental movements like push-ups, squats, and planks is key, and for a deeper dive into effective techniques, check out this awesome resource on muscular strength exercises. Then, get back to those bodyweight gains – your muscles will thank you (and your wallet will too!).
Importance of Proper Warm-up and Cool-down Routines
Think of your body like a car engine. You wouldn’t just jump in and floor it, would you? A proper warm-up prepares your body for exercise, increasing blood flow to the muscles and improving flexibility. A cool-down helps your body gradually return to its resting state, preventing stiffness and soreness.
A good warm-up might include 5-10 minutes of light cardio, such as jumping jacks or jogging in place, followed by dynamic stretches like arm circles and leg swings. A cool-down could involve 5-10 minutes of static stretches, holding each stretch for 20-30 seconds. This helps improve flexibility and reduce muscle soreness. Examples include holding a hamstring stretch or a quad stretch.
Visual Aids: Exercise Demonstrations
Pictures are worth a thousand words, and when it comes to bodyweight exercises, a thousand words might not even be enough to explain proper form! Let’s visually dissect some fundamental movements, focusing on the details that will make all the difference between a productive workout and a potential injury. Think of this as your personal, highly descriptive, and hopefully hilarious, exercise manual.
Push-Up Form and Technique
The push-up: a classic. A testament to human strength (or at least, a testament to how many times you can almost fall flat on your face before giving up). To perform a proper push-up, start by positioning your hands slightly wider than shoulder-width apart, fingers pointing forward. Your body should form a straight line from head to heels, engaging your core to prevent sagging.
Imagine you’re a perfectly taut plank of wood, resisting the urge to become a wobbly jelly.Now, the descent: lower your chest towards the floor by bending your elbows, keeping them close to your body. Don’t let your elbows flare out like startled birds; this puts unnecessary stress on your shoulders. Think of your elbows hugging your sides. Descend until your chest nearly touches the floor, then, using your chest, shoulders, and triceps, push back up to the starting position.
The key is controlled movement. No bouncing, no flailing, just smooth, powerful movements that make your muscles scream with delight (or agony, depending on your fitness level).
Squat Form and Technique
Ah, the squat. The king (or queen) of lower body exercises. Stand with your feet shoulder-width apart, toes slightly pointed outwards. Imagine you’re about to sit in an invisible chair. Now, keeping your back straight (think proud posture, not slouching!), lower your hips as if you’re sitting down.
Your knees should track over your toes; avoid letting them cave inwards or outwards. It’s all about balance and control. As you descend, keep your chest up and your core engaged. This helps maintain stability and prevents injury. Once your thighs are parallel to the ground (or as close as you can comfortably manage), push through your heels to return to the starting position.
Think of it as a controlled, graceful sit-to-stand, only without the chair. Bonus points for making it look like a ballroom dance move.
Plank Form and Technique
The plank: deceptively simple, brutally effective. Begin by assuming a push-up position, but instead of supporting yourself on your hands and toes, rest your weight on your forearms and toes. Your body should be a straight line from head to heels, core engaged, glutes squeezed. Imagine you’re a human ironing board, perfectly flat and sturdy. Avoid sagging in the middle, like a sad, defeated noodle.
Hold this position for as long as you can maintain proper form. Remember, quality over quantity. A shorter, perfectly executed plank is far more beneficial than a longer, wobbly one that risks injury. The plank isn’t just about holding still; it’s about mastering the art of isometric tension.
Last Word

So there you have it – your passport to a stronger, fitter you, courtesy of your own body weight! Remember, consistency is key. Start small, focus on proper form, and gradually increase the intensity. Celebrate your progress, embrace the challenge, and watch as your strength blossoms. Before you know it, you’ll be effortlessly conquering those advanced moves, leaving your doubts in the dust – and maybe even impressing your friends with your newfound superhuman abilities.
Now go forth and conquer!