Best home workout for building strength without equipment – Best home workout for building strength without equipment? Forget pricey gym memberships and complicated machines! This isn’t about becoming the next superhero overnight (unless you secretly
-are* one), but about unlocking your inner powerhouse using nothing but your own bodyweight and a sprinkle of ingenuity. We’ll transform your living room into a temple of strength, revealing the surprisingly effective ways to sculpt muscle, boost endurance, and feel like a million bucks – all without leaving your couch (well, mostly).
We’ll dive into bodyweight exercises that target every major muscle group, explore how to creatively use household items as makeshift weights (think filled water bottles – suddenly, they’re not just for hydration!), and create a personalized workout plan to fit your fitness level. We’ll also tackle common mistakes (because let’s be honest, we’ve all been there), and give you the insider tips to avoid injury and maximize your results.
Get ready to unleash your inner athlete!
Introduction
So, you want to get strong without fancy gym equipment? Fantastic! Let’s ditch the dumbbells and embrace the power of your own bodyweight. But first, we need to clarify what “strength” actually means in this context. It’s not just about bulging biceps (though those are nice!). Strength is a multifaceted beast, and understanding its different aspects is key to building a truly effective home workout routine.Strength training without equipment focuses on developing functional strength, meaning the kind of strength that helps you navigate daily life with ease and grace (or at least without collapsing under the weight of your grocery bags).
This involves building multiple types of strength, each contributing to your overall fitness level.
Types of Strength and Their Development Without Equipment
We’re going to look at three main types of strength: maximal strength, muscular endurance, and power. Developing these without equipment requires smart programming and consistent effort, but it’s entirely achievable. Maximal strength refers to the maximum amount of force you can exert in a single repetition. Think about lifting something incredibly heavy—that’s maximal strength in action. Muscular endurance, on the other hand, is your ability to sustain repeated contractions over time.
Think holding a plank or doing countless squats. Finally, power is the combination of speed and strength; it’s about how quickly you can move a heavy load.Developing these aspects without equipment involves using bodyweight exercises and manipulating variables like repetitions, sets, rest periods, and the tempo of the movement. For example, increasing the number of repetitions builds muscular endurance, while slowing down the movement tempo and focusing on proper form enhances maximal strength.
Adding explosive movements (like jump squats) increases the power component.
Examples of Functional Strength Movements
Functional strength isn’t just about looking good; it’s about being able to perform everyday tasks with ease. Think about these movements:
- Squats: These work your legs and glutes, essential for getting up from chairs, climbing stairs, and carrying heavy objects.
- Push-ups: Strengthen your chest, shoulders, and triceps—crucial for pushing open doors, lifting things, and even getting up off the floor if you happen to fall (it happens to the best of us!).
- Lunges: Improve balance and leg strength, vital for walking, running, and maintaining stability.
- Plank: Builds core strength, supporting your back and improving posture, which is vital for almost everything you do!
- Walking Lunges: A dynamic version of the lunge, challenging your balance and coordination.
These exercises, and many others like them, can be modified to suit different fitness levels. You can progress by increasing repetitions, sets, or difficulty (e.g., incline push-ups for a tougher challenge). Remember, consistency is key! Regular practice will steadily build your strength and improve your overall functional fitness. You’ll be surprised at how much stronger you become, and how much easier daily life becomes.
Bodyweight Exercises for Building Strength
Forget expensive gym memberships and complicated machines! Building serious strength is entirely possible using only your own bodyweight. This method is perfect for beginners, offering a gradual progression to advanced levels, all while saving you time and money. Plus, you can work out anywhere, anytime – your living room transforms into a fully equipped gym!
Bodyweight Exercises and Their Progressions
Building strength with bodyweight exercises relies on progressive overload – gradually increasing the challenge over time. This can be done by increasing reps, sets, adding difficulty variations, or reducing rest time. The table below Artikels various exercises, their target muscle groups, proper form tips, and how to progress through different levels.
| Target Muscle Group | Exercise Name | Proper Form Tips | Progression |
|---|---|---|---|
| Legs | Squats | Keep your back straight, chest up, and descend until your thighs are parallel to the ground. | Beginner: Bodyweight squats. Intermediate: Jump squats, pistol squats (assisted if needed). Advanced: Pistol squats, Bulgarian split squats. |
| Chest | Push-ups | Maintain a straight line from head to heels, engage your core, and lower your chest to the floor. | Beginner: Knee push-ups. Intermediate: Standard push-ups. Advanced: Decline push-ups, plyometric push-ups (clapping push-ups). |
| Back | Rows (using a sturdy table or chair) | Keep your back straight, core engaged, and pull your chest towards the table/chair. | Beginner: Incline rows (using a higher surface). Intermediate: Standard rows. Advanced: Advanced rows with added weight (backpack with books). |
| Shoulders | Pike Push-ups | Form a pike position with your hips high and hands shoulder-width apart. Lower your head towards the floor. | Beginner: Standard push-ups (focus on shoulder engagement). Intermediate: Pike push-ups. Advanced: Handstand push-ups (against a wall initially). |
| Core | Plank | Maintain a straight line from head to heels, engage your core, and hold the position. | Beginner: Forearm plank (shorter holds). Intermediate: Standard plank (longer holds). Advanced: Side plank, plank variations (with leg lifts or arm movements). |
Sample Workout Routines
These routines demonstrate how to structure your workouts based on your fitness level. Remember to listen to your body and adjust as needed.
Beginner Routine (3 days a week, rest days in between)
This routine focuses on building a foundation of strength and endurance.
| Exercise | Sets | Reps |
|---|---|---|
| Bodyweight Squats | 3 | 10-12 |
| Knee Push-ups | 3 | 10-12 |
| Incline Rows | 3 | 10-12 |
| Standard Push-ups (as many as possible) | 3 | AMRAP |
| Forearm Plank | 3 | 30 seconds |
Intermediate Routine (3 days a week, rest days in between)
This routine increases the intensity and challenge, focusing on building more strength and muscle.
| Exercise | Sets | Reps |
|---|---|---|
| Jump Squats | 3 | 10-12 |
| Standard Push-ups | 3 | 15-20 |
| Standard Rows | 3 | 15-20 |
| Pike Push-ups | 3 | 10-12 |
| Standard Plank | 3 | 60 seconds |
Advanced Routine (3-4 days a week, with rest days)
This routine focuses on maximizing strength gains and pushing your limits. Consider adding variations and increasing the difficulty further.
Find out further about the benefits of effective and safe weight training routine for beginners that can provide significant benefits.
| Exercise | Sets | Reps |
|---|---|---|
| Pistol Squats (assisted if needed) | 3 | 8-10 per leg |
| Decline Push-ups | 3 | 12-15 |
| Advanced Rows (added weight if possible) | 3 | 15-20 |
| Handstand Push-ups (against a wall initially) | 3 | 5-8 |
| Side Plank (each side) | 3 | 60 seconds per side |
Utilizing Household Items as Improvised Equipment
Let’s face it, sometimes the gym membership gathers dust faster than your old encyclopedias. But fear not, fellow fitness fanatics! Your home is a treasure trove of untapped workout potential, brimming with surprisingly effective makeshift weights and resistance tools. We’re going to transform your mundane household items into your new personal training squad. Get ready to unleash your inner Arnold (Schwarzenegger, that is, not the creepy neighbor’s cat).Transforming everyday objects into fitness aids is all about smart application of physics – specifically, leveraging gravity and resistance.
By strategically incorporating these items into your bodyweight routine, you can significantly increase the challenge and push your strength gains to the next level. Remember, safety first! Start with lighter weights and gradually increase the intensity as your strength improves. Listen to your body, and don’t be afraid to take breaks when needed.
Five Common Household Items as Improvised Weights
These five everyday items can easily be repurposed to boost the intensity of your workouts. Think of them as your secret weapons in the fight against flabbiness.
- Filled Water Bottles/Jugs: Adjustable weight, easily accessible. Perfect for bicep curls, overhead presses, or even weighted squats.
- Canned Goods: A pantry powerhouse! Soup cans, beans, even those suspiciously heavy jars of pickles – all excellent for adding resistance to various exercises.
- Backpack: A versatile tool. Fill it with books, water bottles, or anything heavy and use it for squats, lunges, or even as a weighted vest for added resistance during push-ups.
- Laundry Detergent Bottles (Full): These surprisingly hefty bottles provide a good challenge for exercises like bicep curls and rows.
- Thick Books: Perfect for less intense resistance. Use them for calf raises, or place them under your hands during push-ups to increase the incline.
Incorporating Household Items into Bodyweight Exercises
Now that you’ve identified your makeshift gym equipment, let’s see how to safely and effectively incorporate them into your workouts. Remember, gradual progression is key. Don’t try to lift the entire contents of your pantry on your first try!
- Squats: Hold a filled backpack or heavy water jug close to your chest for added resistance. Start with lighter weights and gradually increase the weight as you get stronger. For beginners, bodyweight squats are sufficient. Intermediate users can add a moderately filled backpack. Advanced users can add a heavy backpack or even two water jugs.
Enhance your insight with the methods and methods of Pertandingan sengit.
- Push-ups: Place a thick book or two under each hand to increase the incline, making the exercise easier. To increase difficulty, place your feet on an elevated surface. For advanced users, place a heavy backpack on their back.
- Bicep Curls: Use filled water bottles or cans as weights. Start with one bottle in each hand and gradually increase the weight or number of bottles as your strength improves. Beginners should start with smaller bottles; intermediate users can use larger bottles, and advanced users can add more bottles or heavier objects.
- Rows: Use a sturdy chair or table and place a heavy backpack on the floor. Grab the backpack straps and pull yourself towards it. Start with a lighter backpack and increase the weight as you progress. Beginners should use a lighter backpack; intermediate users can use a heavier backpack, and advanced users can use heavier backpacks or add extra weight.
- Lunges: Hold a filled backpack or water jug close to your chest for added resistance. Start with lighter weights and gradually increase the weight as you get stronger. Beginners should start with bodyweight lunges. Intermediate users can add a moderately filled backpack. Advanced users can add a heavy backpack or even two water jugs.
Workout Structure and Programming for Strength Gains: Best Home Workout For Building Strength Without Equipment

Building strength without equipment requires a smart approach. It’s not just about randomly doing push-ups until you drop; it’s about strategic planning and consistent progress. Think of your body as a finely tuned engine – you need the right fuel (nutrition), the right maintenance (rest), and the right training program to maximize its power. This section will help you craft that winning program.Progressive overload is the key to unlocking your body’s strength potential, even without fancy gym equipment.
It simply means consistently challenging your muscles by gradually increasing the demands placed upon them. Your muscles adapt to stress; if you don’t continually increase that stress, they’ll plateau, and your gains will stall. Think of it like this: If you always lift the same weight, your muscles will eventually get used to it, becoming as strong as they need to be to lift that weight, but no stronger.
To get stronger, you need to progressively increase the load.
Progressive Overload Techniques for Bodyweight Exercises
There are several ways to progressively overload bodyweight exercises. Increasing the number of repetitions (reps) you perform in a set is a classic method. If you can comfortably do 10 push-ups, aim for 12 next time. Similarly, increasing the number of sets (e.g., going from 2 sets to 3) will also increase the overall training volume and stimulate further muscle growth.
Finally, altering the exercise variation itself – for instance, progressing from standard push-ups to incline push-ups (easier) or decline push-ups (harder) – provides a new challenge. This keeps your muscles guessing and prevents adaptation to a specific movement pattern. Remember, the goal is to consistently push your limits, but safely. Don’t push yourself so hard that you risk injury.
Sample 8-Week Bodyweight Strength Program
This program incorporates progressive overload principles, focusing on major muscle groups. Remember to listen to your body and rest when needed. Proper form is crucial to avoid injuries; if you’re unsure about correct form, consult online resources or a fitness professional.
| Week | Monday | Wednesday | Friday |
|---|---|---|---|
| 1 | Squats (3 sets of 10 reps), Push-ups (3 sets of as many reps as possible – AMRAP), Plank (3 sets, 30 seconds hold) | Lunges (3 sets of 10 reps per leg), Rows (using a sturdy table or chair, 3 sets of 10 reps per arm), Crunches (3 sets of 15 reps) | Burpees (3 sets of 10 reps), Jumping Jacks (3 sets of 30 reps), Glute Bridges (3 sets of 15 reps) |
| 2 | Squats (3 sets of 12 reps), Push-ups (3 sets of AMRAP), Plank (3 sets, 45 seconds hold) | Lunges (3 sets of 12 reps per leg), Rows (3 sets of 12 reps per arm), Crunches (3 sets of 20 reps) | Burpees (3 sets of 12 reps), Jumping Jacks (3 sets of 40 reps), Glute Bridges (3 sets of 20 reps) |
| 3 | Squats (3 sets of 15 reps), Incline Push-ups (3 sets of AMRAP), Plank (3 sets, 60 seconds hold) | Walking Lunges (3 sets of 10 reps per leg), Rows (3 sets of 15 reps per arm), Bicycle Crunches (3 sets of 15 reps per side) | Burpees (3 sets of 15 reps), Jumping Jacks (3 sets of 50 reps), Glute Bridges (3 sets of 25 reps) |
| 4 | Squats (4 sets of 12 reps), Push-ups (4 sets of AMRAP), Plank (4 sets, 45 seconds hold) | Lunges (4 sets of 12 reps per leg), Rows (4 sets of 12 reps per arm), Crunches (4 sets of 20 reps) | Burpees (4 sets of 12 reps), Jumping Jacks (4 sets of 40 reps), Glute Bridges (4 sets of 20 reps) |
| 5 | Squats (4 sets of 15 reps), Decline Push-ups (3 sets of AMRAP), Plank (4 sets, 60 seconds hold) | Walking Lunges (4 sets of 15 reps per leg), Rows (4 sets of 15 reps per arm), Bicycle Crunches (4 sets of 20 reps per side) | Burpees (4 sets of 15 reps), Jumping Jacks (4 sets of 50 reps), Glute Bridges (4 sets of 25 reps) |
| 6 | Squats (4 sets of 18 reps), Push-ups (4 sets of AMRAP), Plank (4 sets, 75 seconds hold) | Lunges (4 sets of 18 reps per leg), Rows (4 sets of 18 reps per arm), Crunches (4 sets of 25 reps) | Burpees (4 sets of 18 reps), Jumping Jacks (4 sets of 60 reps), Glute Bridges (4 sets of 30 reps) |
| 7 | Squats (5 sets of 15 reps), Incline Push-ups (5 sets of AMRAP), Plank (5 sets, 60 seconds hold) | Walking Lunges (5 sets of 15 reps per leg), Rows (5 sets of 15 reps per arm), Bicycle Crunches (5 sets of 20 reps per side) | Burpees (5 sets of 15 reps), Jumping Jacks (5 sets of 50 reps), Glute Bridges (5 sets of 25 reps) |
| 8 | Squats (5 sets of 20 reps), Decline Push-ups (5 sets of AMRAP), Plank (5 sets, 75 seconds hold) | Lunges (5 sets of 20 reps per leg), Rows (5 sets of 20 reps per arm), Crunches (5 sets of 30 reps) | Burpees (5 sets of 20 reps), Jumping Jacks (5 sets of 60 reps), Glute Bridges (5 sets of 30 reps) |
Remember to adjust the program based on your individual fitness level and progress. The key is consistency and gradual increases in difficulty. Don’t be afraid to modify exercises or take rest days when needed.
You also can understand valuable knowledge by exploring strength training program to increase strength and endurance men.
Nutrition and Recovery for Optimal Results
Building strength without equipment is awesome, but you’ll need the right fuel to power your gains and help your muscles recover like a superhero after a grueling battle with gravity. Think of your body as a high-performance machine – you wouldn’t put regular gas in a Ferrari, would you? The food you eat directly impacts your muscle growth, strength gains, and overall recovery.Proper nutrition is the secret weapon in your strength-building arsenal.
It’s not just about eating enough; it’s about eating theright* things at the right times to maximize muscle protein synthesis (that’s the fancy term for building muscle) and minimize muscle breakdown. Without sufficient protein, your body will struggle to repair and rebuild muscle fibers damaged during your workouts. And without enough carbohydrates, you’ll lack the energy to push yourself during your next session.
Macronutrient Requirements for Muscle Growth and Recovery
To fuel your strength training journey, you need a balanced intake of macronutrients: protein, carbohydrates, and fats. Protein is the building block of muscle tissue; carbohydrates provide the energy for your workouts; and healthy fats support hormone production and overall health. A general guideline for a strength-training individual is to consume 1.6-2.2 grams of protein per kilogram of body weight (0.73-1 gram per pound), 40-50% of your daily calories from carbohydrates, and 20-30% from healthy fats.
Remember, these are just guidelines, and individual needs may vary depending on factors like training intensity, body composition, and metabolism. Consulting a registered dietitian or sports nutritionist can provide personalized recommendations.
Sample Meal Plan for Muscle Growth and Recovery
This sample meal plan emphasizes whole, unprocessed foods and provides a good balance of macronutrients to support muscle growth and recovery. Remember to adjust portion sizes based on your individual caloric needs and activity level.
| Meal | Food Items |
|---|---|
| Breakfast | 3 whole eggs scrambled with spinach and a slice of whole-wheat toast with avocado |
| Lunch | Grilled chicken breast salad with mixed greens, quinoa, and a light vinaigrette dressing |
| Dinner | Salmon with roasted sweet potatoes and broccoli |
| Snacks | Greek yogurt with berries, a handful of almonds, or a protein shake |
Sleep Hygiene and Stress Management for Enhanced Recovery
Think of sleep as your body’s ultimate repair shop. During sleep, your body releases growth hormone, crucial for muscle repair and growth. Aim for 7-9 hours of quality sleep per night. To improve your sleep hygiene, establish a consistent sleep schedule, create a relaxing bedtime routine (avoid screens before bed!), and ensure your bedroom is dark, quiet, and cool.Stress, on the other hand, can wreak havoc on your recovery.
Obtain a comprehensive document about the application of effective and easy weightlifting program for women that is effective.
Chronic stress elevates cortisol levels, a hormone that can interfere with muscle growth and recovery. Practice stress-management techniques like yoga, meditation, or spending time in nature. Finding healthy ways to manage stress is as important as your workouts and nutrition for achieving optimal results. Remember, a strong mind contributes to a strong body!
Addressing Common Mistakes and Safety Precautions
Let’s face it, even the most dedicated home workout warrior can fall prey to some common pitfalls. Ignoring proper form and technique can not only hinder your strength gains but also lead to injuries that’ll have you sidelined longer than a reality TV star’s post-show career. So, let’s arm ourselves with knowledge to avoid these booby traps.We’ll cover three common mistakes, their nasty consequences, and the solutions to keep you strong and injury-free.
Think of this as your personal superhero training manual, minus the spandex and questionable sidekicks.
Improper Form During Push-Ups
Performing push-ups with poor form is like trying to build a house with crooked bricks – it’s unstable and prone to collapse. A common mistake is letting your hips sag or your back arch, which puts excessive strain on your lower back. Another is not lowering yourself far enough, reducing the effectiveness of the exercise. Finally, flaring elbows out excessively puts stress on your shoulder joints.
The consequences can range from minor muscle soreness to serious injuries like sprains or strains in your back, shoulders, or wrists.To maintain proper form, imagine a straight line from your head to your heels. Keep your core engaged, your body rigid, and your elbows tucked in close to your body, lowering yourself until your chest almost touches the floor.
Focus on a controlled descent and ascent, avoiding jerky movements. Think of it like a graceful, albeit slightly sweaty, plank-to-chest-press transition. If you can’t maintain proper form for a full set, reduce the number of repetitions or try a modified version on your knees.
Ignoring the Warm-up and Cool-down
Skipping the warm-up is like trying to run a marathon without stretching your legs first – recipe for disaster! A proper warm-up prepares your muscles and joints for the workout, increasing blood flow and reducing the risk of injury. Similarly, neglecting the cool-down allows lactic acid to build up, leading to muscle soreness and stiffness. The consequences can range from minor aches to pulled muscles and even more serious injuries.Before each workout, dedicate 5-10 minutes to light cardio, such as jumping jacks or high knees, followed by dynamic stretches like arm circles and leg swings.
After your workout, spend another 5-10 minutes on static stretches, holding each stretch for 20-30 seconds. Think of it as pampering your muscles after a hard day’s work. They deserve it!
Overtraining and Neglecting Rest, Best home workout for building strength without equipment
This is a classic mistake. Overtraining leads to muscle fatigue, increased risk of injury, and a plateau in your strength gains. Your body needs time to recover and rebuild after each workout. Neglecting rest can lead to burnout, decreased motivation, and ultimately, hinder your progress. The consequences are obvious: exhaustion, reduced performance, and increased susceptibility to injury.Listen to your body.
Rest days are not days off; they are crucial for recovery. Aim for at least one or two rest days per week, depending on your workout intensity and schedule. Don’t be afraid to take extra rest days if you feel overly sore or fatigued. Remember, progress isn’t linear; it’s a marathon, not a sprint. And marathons require rest stops.
Visual Aids
Let’s ditch the fancy gym equipment and embrace the power of visualization! Understanding proper form is crucial for maximizing results and minimizing the risk of injury in your home workouts. Think of it as having a personal trainer whispering in your ear – except this trainer is made of words (and maybe a little bit of imagination). We’ll break down the perfect form for three fundamental exercises, providing you with a mental image so clear, you’ll feel like you’re already nailing those reps.
Push-up Form
Proper push-up form involves a straight line from head to heels, engaging your core to prevent sagging. From the front, you should see a straight line from your head to your hips, with your shoulders pulled down and away from your ears. Your hands should be slightly wider than shoulder-width apart, fingers pointing forward. From the side, your body should remain straight, avoiding a hip-drop or excessive arching of the back.
From the back, you’ll see a symmetrical posture with your spine aligned. Beginners often struggle with maintaining a straight line, so focus on engaging your core and glutes to stabilize your body. Remember to breathe: inhale as you lower, exhale as you push up. Think of it like pushing a heavy object away – a stubborn fridge, perhaps.
Squat Form
Picture this: you’re about to sit down in an imaginary chair. That’s the essence of a perfect squat. From the front, your knees should track over your toes (avoid letting them cave inwards) and your back should remain straight. Your chest should be lifted and your core engaged. From the side, observe a smooth, controlled descent until your thighs are parallel to the ground (or as close as comfortably possible).
Your heels should remain flat on the floor. From the back, you’ll see a straight spine and a balanced posture. A common mistake is leaning too far forward – imagine a plumb line hanging from your ear, aiming for your mid-foot. Beginners can use a wall or chair for support to build confidence and maintain balance. Remember to breathe deeply, inhaling as you lower and exhaling as you rise.
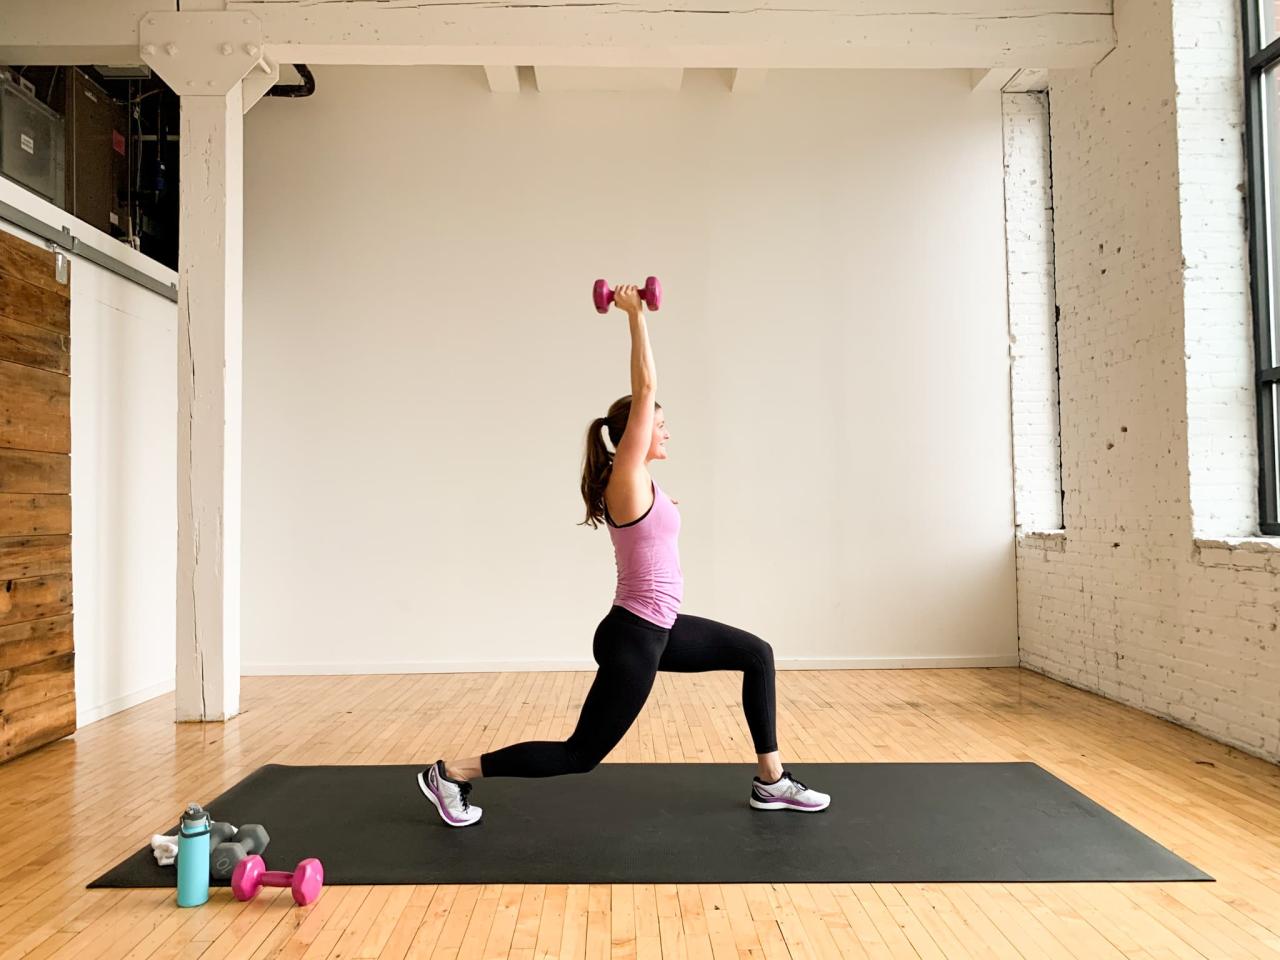
Lunge Form
Lunges are all about controlled movement and balance. From the front, you’ll see one leg forward with your knee bent at a 90-degree angle, and the other leg extended behind you, also with a 90-degree bend in the knee. Your torso should remain upright. From the side, observe that your front knee doesn’t extend past your toes, preventing undue stress on your joints.
Your back should be straight, and your core engaged. From the back, you’ll see balanced weight distribution between both legs, with a straight spine. A common beginner mistake is leaning too far forward, causing the front knee to collapse inward. Focus on maintaining a strong core and keeping your weight balanced. Remember to alternate legs and maintain a steady, controlled pace.
Inhale as you step forward and exhale as you return to the starting position.
Outcome Summary
So, there you have it: your passport to a stronger, fitter you, courtesy of your own home. Remember, consistency is key. Start small, celebrate your progress (even the tiny victories!), and don’t be afraid to get creative. Your body is your ultimate gym, and the possibilities are endless. Now go forth and conquer those squats (and maybe that mountain of laundry while you’re at it!).
1 thought on “Best Home Workout for Building Strength Without Equipment”